Sunday, August 31, 2014

BGC#57 - Water colouring with Jovita

Here i am on the last day of the challenge sharing with you all an inspiration for the watercolouring challenge.

Recently I took the Online Card Class and this is a technique I learnt there... Its Freehand water colouring.

Since I did not have the best set of water colors I have used my Staedtler Water colour pencils and brush to make this card. The main colors are used from this set.


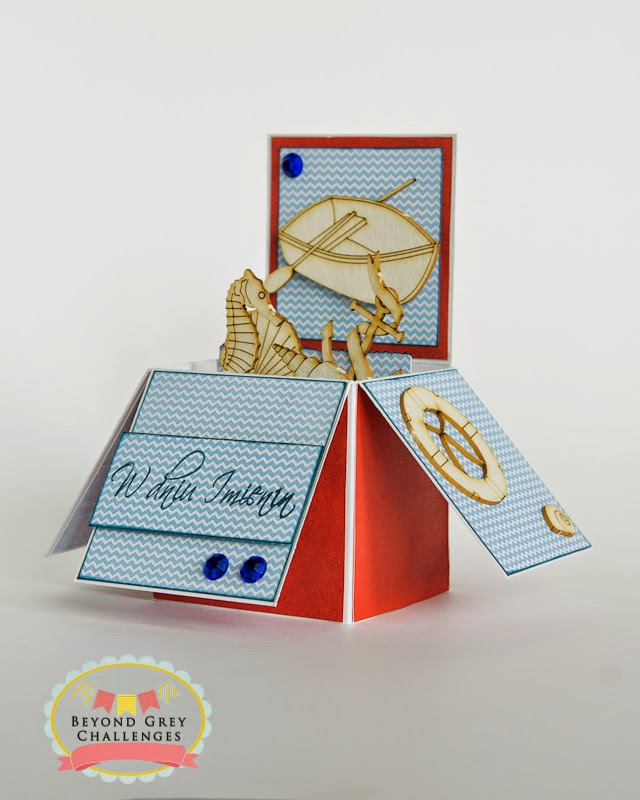
I just roughly drew the boxes with a pencil. Then I colored the boxes with my water color pencils and blended the colors with a brush and water. 


After it dried i used my permanent black marker to outline the boxes and draw the bows. 


Next i used my Signo White Pen to give the detailing such as the circles on the purple box and the dots on the blue box. A touch of glitter to give the 3D pop. 


The sentiment from Hero Arts just fit perfect for this card. 
Watercolors gives that imperfect yet natural look to any project . A must try for all crafters. 

I myself am wanting to try out so many other combinations of techniques in watercolouring.

Do try it and join in the Challenge here


Monday, August 25, 2014

BGC#57 - Watercolor challenge Karen

BGC#57 - Watercolor challenge Karen


Hello my crafty friends!!  Glad to be back with another challenge!!  My team members have been crankin out some truly BEAUTIFUL watercolor projects!!!  I have also been loving all of your entries!! 
My 3 daughters all work with watercolors!!  I start all of my children off with this medium!  It is so enjoyable and easy to use!!  I can't wait to see what each of you comes up with!
Have fun, Karen 

Challenge Guidelines : 


Make a card , LO or a 3D project (strictly paper crafts )

You must use Watercolors in the project ! 

Go CAS, fully layered, color an image or create a completely new design of your own with watercolors! Just have fun. ... with watercolors! 

Dates :  16th Aug - 31st Aug.


Here is where I started......
I started with a sheet of watercolor paper.  I had intended to make a card but it turned into a mini album.  I had some of the gorgeous new Heidi Swapp cards that have the watercolor look and I wanted to include those.  My watercolors were rather shabby since it appeared that one or more of my children got into them. Oppps......thats a no-no!  I decided to try my gelatos. 

They make beautiful vibrant watercolors!  They can be used so many ways but I put down water on my mat then rubbed in a little color to make my watercolors.


I used the watercolor sheet as the cover and painted a soft version of the colors from blue to yellow. I used a digi image that I found and used my copics to color it ( second image I have colored so I'm still learning) It looks a lot like my oldest daughter and her beau.  So this turned into a book for her to put their pics in!! Hence the miss-mosh of style and papers because that's how she likes it!!


Here are some of the inside pages.


I used of the project life cards for hidden journaling and a few in pockets for photo mats.


I used the same watercolors on some of the embellishments.


Thanks for looking! Keep those watercolor creations coming!!

Friday, August 22, 2014

BGC#57 Watercolor card with zubmomi!


Hello friends!  Welcome to another post for the BGC# 57 'Watercolor'. 
Our lovely DT Aneta  has given us this amazing theme 
and we are loving the awesome entries submitted by you so far  :)


Challenge Guidelines : 
 Make a card , LO or a 3D project (strictly paper crafts )

You must use Watercolours in the project ! 

Go CAS, fully layered, color an image or create a completely new design of your own with watercolors! Just have fun. ... with watercolors! 

Dates :  16th Aug - 31st Aug.

Here is my card for this challenge:


I have stamped the roses and leaves randomly on the edges of a watercolor paper using distress inks and then sprayed water over the paper to activate it. I then used watercolors to paint the roses and let them blend naturally by adding more layers on top without allowing the first layer to dry. 

I did the same with the leaves.


 Another view:


Finally, I added a wash of blue color in some areas for the balance and added the sentiment.


Hope you like my card :)

Please link your projects here.


Take care :)
zubmomi


Tuesday, August 19, 2014

BGC#57 - Watercolor cards with PJ

Hello my lovely readers !
I am loving all the creations you are giving us so far in our challenges!
aren't you enjoying our new theme ?
Well i totally did ! :) lets check out the guidelines again 

Challenge Guidelines : 

Make a card , LO or a 3D project (strictly paper crafts )

You must use Watercolours in the project ! 

Go CAS, fully layered, color an image or create a completely new design of your own with watercolors! Just have fun. ... with watercolors! 

Dates :  16th Aug - 31st Aug.

So ok :) here is what i made 
 There are many ways to go about this challenge . 
I am demonstrating two , Stamped image coloring and freehand watercolour painting !

 In the above card i have stamped the floral image on watercolor paper . 
Then i went ahead and colored it using watercolors and added a wash of blue all around the image. once it was dry i stamped my sentiment and the arrow stamp in the corners.

 For this card i just went free hand ! i did some colored circles and random shapes to make my flowers and created some green spaces in between to make my leaves. once it was dry i went over the whole thing forming leaves and flowers with my waterproof black pen. It then formed this bouquet . Its not perfect but i think i like this one better than the perfectly stamped image card. :)

What are your thoughts ? I would love to hear them :)  

 You can join the challenge HERE 
  
See u next month ! :) with more

Saturday, August 16, 2014

BGC#57 - Watercolors


Hello there! It's great to be a host again. :-)
Thank you for amazing entries to our last challenge. You are really creative! 
I hope, that you will play along with us this time, too! We want to see your projects with using watercolors. What and how? Follow our guidelines to know more...


Challenge Guidelines 
Make a card , LO or a 3D project (strictly paper crafts )

You must use Watercolours in the project ! 

Go CAS, fully layered, color an image or create a completly new design of your own with watercolors! Just have fun. ... with watercolors! 

Dates :  16th Aug - 31st Aug.
This time we have great prizes sponsored by


This time I have two inspirations for you: two card with this same image, which I colored with watercolors.
First card is more blue, with blue Tilda's skirt, blue butterfly and the dark blue sentiment.


The second one has more pink details: Tilda's flower, adhesive gems, ribbon and delicate patterned paper.


I used: white cardstock, patterned paper, Magnolia's stamp, chipboards by I-Kropka and CraftFun, butterfly - UHK Gallery, paper flowers, pigment ink by Latarnia Morska, watercolored pencils.

As usually, we are looking forward to see your projects!
Please enter your links below. 


Tuesday, August 12, 2014

BGC#56- Nautical Card with zubmomi!


       Hello friends!  Welcome to another post for the BGC# 56- Nautical Challenge.
Our lovely DT member, Karen has given us this amazing theme and we are loving the 
awesome entries submitted by you so far :)

Challenge Guidelines : 
  • Make a Card , LO or paper crafted project with the Nautical theme .
  • By Nautical we mean - something concerning navigation in the sea , sailors, maritime, or the sea. Go for elements like anchors , lifebuoys , ships , lighthouses , fishing nets , navigation gear , compass etc.
  • Dates : 1st - 15th Aug 
We would like to thank our generous sponsors:

Sponsors 2014 


Here is my nautical themed card for the challenge:


I made the background by embossing and inking the cardstock and layering patterned paper on it. 
The main focus of my card is the circular window/ porthole.

I have tried to create a small scene inside the window by gluing the colored sand for the beach and waves. Between the waves is a small ship which can also be moved. 
The sentiment is stamped. 


Hope you like my inspiration.


Please link your projects here.


Take care :)

zubmomi


Saturday, August 9, 2014

BGC#56 - Nautical Easel Card with Jovita

Hello and welcome to a new day!! 

Today I am here to share my inspiration for the Nautical Theme Challenge. 

Challenge Guidelines : 
  • Make a Card , LO or paper crafted project with the Nautical theme .
  • By Nautical we mean - something concerning navigation in the sea , sailors, maritime, or the sea. Go for elements like anchors , lifebuoys , ships , lighthouses , fishing nets , navigation gear , compass etc.
  • Dates : 1st - 15th Aug 

I have never made a card with this theme and somehow it never struck me that a simple challenge would get me thinking and drive me crazy. I jotted down different sentiments to work around but some how I could not get it together... I even made paper boats to get my self to make something but that also did not set together.

Thats when I came across this sentiment... and I just loved it.... From then on I enjoyed every bit of making this card. 


I have made a simple easel card giving more emphasis on the sentiment.
The background paper is a PP from Echo Park - Little Boy collection...


The Lifebuoy is cut using the Spellbinders Circle die and coloured with sketch pens... A little bit of Bakers twine and that completes it.


The Lifebuoy and the Circle with the "Good Luck" Sentiment are given a raised effect with foam tape which when seen in real gives a floating effect.

Oh here I should mention something new that I have tried out . The sentiment Good Luck from the TPC Sentiments stamp set is a single stamp  and I wanted the words one below the other. So in Jennifer McGuire Style.... I cut my stamp in two and placed the exactly how I wanted and stamped. Now its back save in its packaging. So no worries there...


However I don't think I could ever do that to any of my other sets... But yes you can do a lot more with your stamps this way... You just need to think creative.

So I leave you with this wonderful sentiment... 


Do leave some love if you have enjoyed this post and also do join in the challenge

Have a great day!!!

Hugs
Jovita


Thursday, August 7, 2014

Winners day -BGC#54 & July celebrations

Hello everyone !
Welcome back to another Winners post !
Today we are going to look back at our favourites from Bgc#54-lets-get-kiddish
Some of the entries really blew our mind! 
Here are the Toppers !

With this sweet little swing card ! she a lovely tute for it on her blog too !! check it out !

With this microquilling in a watch !!! what !!!!!!! welll that was my reaction to it when i saw it !
leave alone quilling i could never fit anything inside that watch myself !!! so bravo !! 


Well don't judge a book by its cover for sure !!! This album is so simple yet so much of hard work !
Love that :) great going !

We also have an Honorable mention badge to give out this time ! 
which goes to 
 Sujana
 I really loved this pop up ! such a nice invitation ! 

Sujana please email lightbox.c(at)gmail(dot)com for your badge.


The random winner for this challenge is- 
8. Dharshana   
with this card 
Thats wonderful !!! congrats Dharshana you have won 
 please check the end of the post for more details. 


Now coming to the July celebrations
first of all thank you so much for flooding our mail box with so many entries and so many thoughtful comments for BGC. we love u all so much for giving us so much love ! 

Here is the Key - 

The brand names were - 
Avery Elle
Viva 
Ranger 
Sakura 
Xyron
WOW
Sizzix
Joy crafts 
May Arts
Maya road
Fiskars
DCWV
carta bella
Bo bunny
Prima
lawn fawn   


Now the qualifying question - 

From left to right - 
Zubaida , Shafaq , Kalindi , Bipasha 

The quickest person to mail us the correct answers is - 
Congratulations Hussena ! You had all the answers right and you were among 
the first few people to email us ! 
You have won 
Prima Something Blue ATC Cards 3X4 - 15 Designs/3 Each
 DYLUSIONS CALYPSO TEAL INK SPRAY

Winners please email your full Indian address and phone to lightbox.c(at)gmail(dot)com.
With the subject line being - Winner BGC#54  or Winner June celebrations

Thanks for joining us today!

Wednesday, August 6, 2014

BGC#56 - Nautical pop-up box card with Aneta

Hello in this beautiful morning!
I hope you're doing well.
It's my turn to inspire you in our nautical challenge and I hope I'll. 

Let's start with the rules first.
Challenge Guidelines : Make a Card , LO or paper crafted project with the Nautical theme .By Nautical we mean - something concerning navigation in the sea , sailors, maritime, or the sea. Go for elements like anchors , lifebuoys , ships , lighthouses , fishing nets , navigation gear , compass etc.

Dates : 1st - 15th Aug 

I prepared pop-up box card. It's still my favourite type of the card, so creating was pure pleasure to me.
In my creation you can see red, white and blue colors and details connected with a sea: seahorse, anchor, boat and shells. There are also small waves inside cut out from the blue-and-white paper.


I have also a few photos - my a work in progress.

Here are my supplies. One of the reason why I like pop-up box cards is, that I can reuse all small pieces of paper remaining from different projects.


I started with a white cardstock. I cut it to 16 cm x 30 cm and scored at 7, 14, 21, 28 cm. Then I rotated the cardstock and scored it again at 7 cm. This way every square has 7 cm x 7 cm and the scored cardstock looked this way.


Then I cut down scored lines along (stopping in the middle) and prepared six squares (6,5 x 6,5) cm and one bigger rectangle (6,5 x 13,5) cm and decorated outside of the card. I also cut off a small rectangle on the right.

My next step was decoration of the inside part.This part is more visible when your card is finished.
This time I inked each white-and blue patterned square using dark blue pigment ink. I usually decorate it as it's shown here, but you can also add patterned squares to the rest of the white pannels and make your pop-up card even more colourful.


Next, I attached the small rectangle inside with adhesive and prepared two strips of paper and placed them inside of the opened box, near to the edge. They are a base for small waves and nautical embellishments: seahorse, shells and anchor. I added the rest of the chipboards.

The last step was placing the sentiment on my card. I stamped it on the white-and-blue patterned paper and sticked to my card with 3D foam tape. When it was ready, I finished my card adding dark blue gems.

It  is not so difficult, isn't it?

I would like too see your nautical project. You can share it with us HERE.


See you soon!
Aneta


Popular Posts